This camera takes digital photos and stores on a floppy disk. Video/audio capabilities are available for up to 60 seconds per floppy disk.
Getting
Started: Instructions for Sony
Mavica Digital Camera
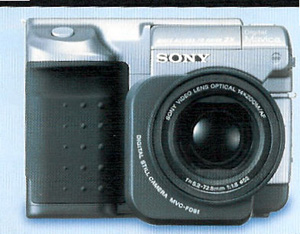
Sony
Mavica Digital Camera Instructions
Equipment: Sony
Mavica Digital Camera
1 Disk – 3.5 inch, MS-DOS format
1 Battery
1 Battery Charger
1 Carrying Bag
Charging the battery:
1. Place the battery in the charger securely.
2. The light should go on.
3.
When the light goes off, the battery is ready to use.
Using
the Sony Mavica Digital Camera
Display:
1. The display can appear in the LCD screen or in the eye viewfinder. To change this, the button is under the eye viewfinder.
2. To use the Menu: When menu is highlighted in the display, press the round control button. Menu options include: Clock set, Beep, Disk tool, File Number, Flash level, Image size, Quality, and Recording mode.
3. The small battery in the lower right corner indicates how many minutes of battery life are left. The amount of battery time changes depending on the mode that you are using (Still/Movie/Play).
4. The small square in the upper right with the circle indicates remaining disk capacity.
Camera controls:
1. Power On and Off which is located on the right side of the camera.
2. Still/Movie/Play located below the LCD screen. To change function or modes of use: Choose Still (pictures), or Movie (movies that are 60 seconds in length or longer) and then Play (to review pictures or movies taken).
3. Menu-Located below the LCD screen. Press to enter and then use arrow keys to move through menu.
4. Display turns on and off the on-screen display.
5. Flash turns on and off the flash option. The Flash can be opened with the Flash open button on the left side of camera.
6. Disk eject-To remove disk, slide the eject lock down and move the disk eject to the left.
7. Disks are inserted are on the right side of the camera with the label side up.
Controls located on the
left side of the lens barrel:
1. The zoom control for the lens moves objects in closer or farther away.
2. Auto/Manual Focus control-Auto focus works best for most of the camera use. Remember to give the camera a second or two to focus. When you are not getting the sharp focus or contrast that you desire, use manual focus.
3. Steady Shot-This switch should be ON when using the camera to adjust for the shaking that may occur when not using a tripod.
Controls located on the
left side of the camera:
1. White Balance-Adjusts for the difference in light source to allow for white objects to look natural.
2. One Push White Balance-For manually adjusting the white balance to suit lighting conditions.
3. Program AE-Three functions or programs: The Aperture priority mode (A) to set depth of field (the focus on the subject and background); The Shutter speed priority mode (S) allows setting of the shutter speed to allow for moving objects or subjects; Twilight mode for taking night time scenes, fireworks, etc.
1. Make sure the battery is in the camera.
2. Insert a formatted disk.
3. Turn power on.
4. Select Still mode to take pictures.
5. Select Auto or Manual focus.
6. Adjust for the telephoto / zoom distance.
7.
Press the shutter button down halfway. This will freeze
the Auto Exposure (AE),
Auto
White Balance (AWB) and the Auto Focus (AF).
8. Press the shutter button down fully to record the picture.
1. Select Movie mode to take up to 60-second movies.
Press the shutter button down fully momentarily. Images and sound will be recorded for approximately 5 seconds.
Press the shutter button down and hold. Image and sound will be recorded until the button is released. (60 seconds for 160 x 112 size; 15 seconds for 320 x 240 size)
1. Set mode to Play.
2.
Select Index with the control button to see all images
on disk. Movies are indicated
with
a small icon in the upper left corner.
3. Using the control button, move the arrows to the desired image.
4. Press the control button to see the image.
5.
To view a movie, select the movie and then using the
control button move to the right
arrow
play button.
6.
To delete a picture that you do not want select the
picture or movie. Go to Menu. Go
to
Delete.
To
copy pictures to your computer Using Microsoft’s Photo Editor
(installed
on your computer)
1.
Double click My Computer icon.
2.
Double click 3½" floppy disk if you’re downloading pictures from
a disk.
3.
Choose pictures to open by double clicking on the picture icon.
4.
Choose Image on the Toolbar.
Choose Crop
under the Image choices.
Adjust centimeters, inches, or
pixels to capture exact part of the picture.
Or complete an easier way by
choosing the cropping tool in the tool bar that looks like a square made with
dotted lines and apply (by clicking and dragging) to get the desired part of the
picture.
5.
Choose Image on the Toolbar.
Choose Resize under
the Image choice.
Adjust height and width to
desired size.
You may choose to allow
distortion of the resized image by having that box checked.
6.
Choose Image on the Toolbar.
Choose Rotate
under Image choices.
Make selection to rotate:
§
Left
§
Right
§
Transpose
§
Invert
§
Mirror
§
By degree
7.
Choose Effects on the Toolbar to adjust picture effects.
Sharpen
Soften
Other choices
Click
Edit and choose Undo
for any changes made that are not desired.
When
desired picture is ready, click Edit and
choose Copy.
Open
up document to where picture is to be placed, then click Edit
and choose Paste.
8.
Your desired picture should appear in your document.