Inspiration®:

Inspiration®:
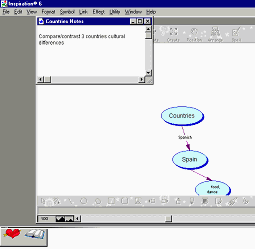
Inspiration is a graphic planning tool that brings the power of visual
thinking to the computer. It allows an individual to create colorful, visual,
idea maps. For creative brainstorming and planning, Inspiration's diagramming
helps individuals quickly record ideas and map out concepts. An idea map can be
generated within a few minutes. With a click of a button, the maps can then be
changed into outlines or the outlines into visual maps. Inspiration assists
individuals who need assistance with organizational tasks prior to completing
written assignments. Use Inspiration across the curriculum for: Brainstorming; Webbing; Diagramming; Planning; Critical Thinking; Concept
mapping; Organizing; and Outlining.
Getting Started:
Instructions for Inspiration
Inspiration® Instructions
1.
Open the Inspiration software. Diagram view will appear.
2.
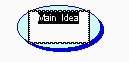
Type a main idea in the symbol box that appears.
3.
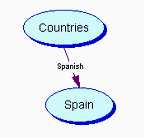
Select the location of the next idea symbol by clicking on the
corresponding arrow in the Create tool in the Inspiration menu bar. When
you point to an arrow on the Create button, it is highlighted to show which direction the new
idea symbol will be created. Click on the new symbol and enter the text.

4.
Or to add a subtopic to a symbol, click anywhere outside of the symbol
and a +  sign
will appear. Type the subtopic and an identical symbol shape will appear around
the subtopic. To link the subtopic to the main idea symbol select the Link tool
sign
will appear. Type the subtopic and an identical symbol shape will appear around
the subtopic. To link the subtopic to the main idea symbol select the Link tool
 in
the menu bar, select the main idea symbol and the subtopic symbol. The symbols
will be linked together. To add text to the link, click on the link and begin
typing in the text box.
in
the menu bar, select the main idea symbol and the subtopic symbol. The symbols
will be linked together. To add text to the link, click on the link and begin
typing in the text box.
5.
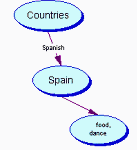
To add ideas to describe the subtopic, select the subtopic symbol by
clicking on it. Select the Rapid
Fire
icon  in the menu bar and a red lightening
bolt will appear after the subtopic word. Begin typing words associated with the
subtopic. When you are done then select Enter on your keyboard and the associated words will
"rapid fire" out from the subtopic to a new symbol cell.
in the menu bar and a red lightening
bolt will appear after the subtopic word. Begin typing words associated with the
subtopic. When you are done then select Enter on your keyboard and the associated words will
"rapid fire" out from the subtopic to a new symbol cell.
6.
To change to outline view, select Outline
View
 in
the menu bar.
in
the menu bar.
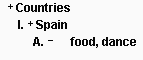 To switch back to diagram view, select Diagram
 which
appears now in
the menu bar.
which
appears now in
the menu bar.
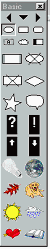
SYMBOL SHAPES: To
change the shape of a symbol or a group of symbols-select the symbol or hold
down the shift key as you click each symbol for a group.
Choose the symbol from the symbol menu on the left. (If the menu isn't
available select View-Symbol
Palette).
Use the left/right arrows on the symbol palette to view additional symbols.
Other symbol libraries are available by selecting the center arrow on the symbol
palette and holding it down.
LINE STYLE:
To change the line style-select the
symbol and then choose the line thickness, patters, colors… from the Effect
Menu
in the top toolbar.
SHADOWS:
Can be added or omitted by selecting the
symbols and choosing Shadow
from the Symbol
menu in the top tool bar.
SYMBOL SIZE:
Select a symbol and drag the lower right
corner. (Size it proportionally by holding down the shift key during this
procedure).
TEXT:
Edit by selecting the symbol and selecting the desired font and format.
POSITION OF A LINK:
Change by selecting a link and then
dragging either of the ends to a new point on a symbol. Be sure the symbol is
highlighted at the point where the new link is going to be added or the link
will not move.
NOTES TEXT:
Can be added in outline or diagram view.
To add Notes Text in the Diagram view, select a symbol, double-click on the
upper left handle to open a Notes window and then type in the text. Close the
Notes box to exit. When you select a symbol where notes have been attached you
will see that the top left box turns sold red. (In the outline view, select the
topic and select Return before typing the text).

TEXT ONLY:
To add text only, select the Text
Only button
(square with an A in it) from the bottom tool bar. 
POSITION:
To change the diagram placement on your screen select-Position-from
the Inspiration menu bar.  Your cursor will become a hand.
Place the hand over the diagram, click and drag to the desired position.
Your cursor will become a hand.
Place the hand over the diagram, click and drag to the desired position.
ARRANGE:
To select the order and appearance of the diagram select-Arrange-
 from the Inspiration menu bar. Select
the desired default preferences by clicking on them.
from the Inspiration menu bar. Select
the desired default preferences by clicking on them.
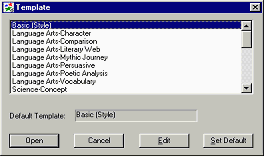
TEMPLATES:
File-Template-(select
desired template)-Open.
PRINTING:
File-Print
Options-Select-Fit
to 1 page.
http://www.inspiration.com